Friday, November 1, 2013

Delicious Bonnets of the Early 19th Century

As an early Christmas present, next weekend I'll be going to Lydia Fast's Bonnet Workshop!  In preparation I've been collecting digital images of the gorgeous bonnets of the Regency era.  Here are only a few of the images I found!  If you would like to get an idea of what I'll be doing at the workshop, please read my friend Julia's recap of the 2012 workshop.  Enough talking, now pretties!

The one in the top right is one of my favorites.

Ackermann's Repository 1809--I love the one in the bottom right!

I'm planning on making the one in the bottom right corner, because I love the gorgeous simplicity!

All of these bonnets are gorgeous, but especially the one in the bottom left.

Ackermann's Repository 1815--I am completely envious of this woman's entire outfit, but especially her bonnet!

And finally, this is the bonnet I'll be reproducing in the workshop!  It will have a light pink brim lining and a yellow crown, with dark pink flowers and feathers.  This is from Ackermann's Repository 1814.

Tuesday, October 22, 2013

Fashions from Peterson's Magazine: July 1854-June 1855

I recently acquired two volumes of Peterson's bound in a peculiar fashion.  Instead of binding January-December of the same year together, these two bound July 1854-June 1855 and July 1855-June 1856.  I found this quite interesting, as all of my other bound volumes have contained the same calendar year within.  Oh well!  Peterson's listed the table of contents for previous volumes every half-year, so I suppose the woman who owned these didn't want to wait until January to start collecting!  Anyway, here are some of my favorite images from the volume of July 1854-June 1855.  Feel free to share, but please cite my blog.  And enjoy!


Thursday, October 17, 2013

A Lovely Accessory

I recently completed a knitting apron for my dear friend Deborah as part of an exchange.  In return, she knitted me a lovely pair of knitted under sleeves that were delivered to me via the post office at BGA Gettysburg... yes.  That was quite a while ago, but I have finally gotten around to finishing her apron!  Here it is in all its glory... on my dorm room floor.


The body of the apron is 100% silk taffeta with rayon velvet trim.  The taffeta was purchased from an Ebay vendor and the trim is from Needle and Thread in Gettysburg.  It is based off of an original in a private collection, which the owner graciously shared with me in order to make it for Deborah.  All of the trim is applied by hand, as are the pockets.  The only machine stitching is in the waistband.  I will be adding a buttonhole to the waistband and Deborah will be supplying a button.  All in all, I'm very happy with how it turned out!  It will look very lovely for her to knit in.

Here are some close-ups of the apron in the construction progress:


The initial photo of the fabric and the trim in natural light.  After some consideration, Deborah and I decided that plum trim would suit this reddish-orange very nicely.


A close-up of the hand-applied trim


And a close-up of my delicate stitches, of which I am very proud.

Sunday, October 13, 2013

Recent Acquisitions: CDVs

Recently, I've been collecting some original images to add to my collection.  Here are the CDVs that I have picked up.  Soon I will get around to posting the colored plates from the editions of Peterson's and Godey's I've acquired.  But, for now, some lovely CDVs.  All of these are from the UK, and if anyone would like to see the back of one of the images, please let me know in the comments.  Feel free to pin and share, but please cite my blog.  Thank you!

I love this woman's bonnet and her leather gloves!

The skirt trim on this is gorgeous, and the baby is pretty adorable too :)

Lovely sleeves!

I might tentatively date this to pre-1860's based on the tiered skirt, but I could be wrong.  What a nice coat on the gentleman, though!

One of the two tinted CDVs in my collection now.  I love that the cravat is tinted blue; Sam liked it very much!

I love her sleeves.

I might date this to post-war due to the hairstyle.  How interesting for her belt buckle to be off-center, as well...

The second tinted CDV in my collection.  I can't express how much I adore this image.

Check out her skirt--you can count her hoop rungs!  Also, the last rung is very far off the ground.  How interesting!

A-freaking-mazing skirt ruffles.  To die for!

Another sweet face.

Moire--yum!

This picture eerily looks like my mother when she was younger...

I love the rosettes down the front of this gown.

Gorgeous trim!  I would probably date this as post-war due to the shape of the crinoline and the style of hair.

And finally, something near and dear to my heart--reading.  What a sweet image.

Wednesday, October 9, 2013

The Best Laid Plans...

So, I'm sure everyone has been waiting for a Chickamauga recap.  I'm sorry to say that there won't be one, because, well, Sam and I never made it to Chickamauga.  It turned out that, with Sam's school schedule and the layout of the event site, we wouldn't have made it in time.  The best case scenario would have been us sleeping in our car one night (after driving 8 hours) and sleeping in a borrowed tent the next night.  It simply wasn't possible.

However, we did get the opportunity to go to a nice little event in Louisville: 100 Years on the Ohio.  It was a timeline event reaching from 1765-1865, so I got to see some friends I normally see at 1812 events.  There was a lovely little dance Saturday evening and a vintage baseball game Sunday afternoon.  The grounds were lovely to wander around.  In retrospect, it was better for 100 Years to be Sam's first event than Chickamauga would have been.  While going down to Georgia would have been fun, it was nice to have a relaxing event to go to and a real bed to sleep in at night.

Sam loved it, at least from what I heard him say.  He had a great time dressing out and making new friends, and even suggested we make the event an annual thing.  All in all, we had a very lovely time.  Enough for talking, now pictures!


Waiting for the sun to set before the dance


I didn't realize until this event that my red dress really needs to be let down.  No worries though, it has a bit of a hem in it.  I also need to take Sam's pants in.


I used my antique paisley shawl for the first time at this event.  It was a very nice accessory, as the weather was a bit nippy.


A candid taken by my new friend Toni during the vintage baseball game--featuring delicious homemade ice cream!


I think we make a handsome couple, if I do say so myself.  Sam's clothes weren't perfect, but at least I know for next time what to do differently.  However, I think he looked pretty good for his first event.

Wednesday, September 4, 2013

Super Belated Historical Sew Fortnightly Challenge #16: Separates

Because I like to procrastinate, I of course waited long after the 16th HSF challenge was due to finally finish my project (hey--at least it's finished!)  In preparing for the 150th Anniversary of the Battle of Chickamauga, which my beau happens to be attending with me (It's his first event!), I had a lot of men's sewing to do.  In order to send in his application for the civilian town at the event, well, he needed to be wearing clothing.  So, I set to work.  Finally, I got him looking presentable this weekend.  I'll be posting the rest of his clothing as it gets finished, but first, drumroll please...


His work shirt!  In the 1860's, working class men often wore a wool or linen work shirt or overshirt (like a smock) in order to protect their clothing from the items they were working with.  Since Samuel is portraying a farmhand, this was one of his most necessary items.  Beneath he is wearing suspenders and a white shirt, with a pair of gray wool trousers.  I plan on adding a white collar and cuffs, as I took inspiration from this piece:


Now for the particulars!

The Challenge: #16: Separates

Fabric: Brown medium-weight 100% linen

Pattern: Laughing Moon #107

Year: 1860-1865

Notions: Six china buttons, poly Gutermann thread, (1) Cutting assistant and general cheerleader

How historically accurate is it?: I would say 85%.  Necessary parts are done by hand (buttonholes, cuffs, neckband, etc.)  Once I add the collar and cuffs it will be even better.

Hours to complete: 7 so far, with about 1-2 to go.

First worn: This past weekend for a picture, but its first event will be Chickamauga.

Total cost: $25, all things considered.

Tuesday, August 20, 2013

Early 1860's and Late 1860's: What's the Difference?

{Please bear in mind that I am in no way an expert: I am simply reporting on the trends I have seen, and hoping to educate people so they don't make the same mistakes as I have (yes, I might have once bought silk to make an 1866 ball gown for CW use...)  Please, anyone, chime in if they have any additional information, I'd love to hear it!}

Often, pictures circulate around Pinterest tagged with a vague date of "1860's" and they're hailed as beautiful creations of the Civil War era.  They are all quite beautiful (I think 1865-1869 is probably my favorite half-decade in fashion history), but they should not and cannot be used as an inspiration piece to be worn to a sesquicentennial event, a ball, or any event that is focused on the years of the American Civil War.  Because places like Pinterest and even some museum sites can often be vague, here are some hallmarks of gowns of the late 1860's:

1. Flat fronts


Both gowns shown here were dated "1860's" by their respective pinners on Pinterest.  However, if you look at the skirt of the gown on the top, you can see that there is at least a ten inch panel of unpleated fabric in the front of the skirt.  This is a hallmark of the late 1860's.  This is the most noticeable of all of the trademarks of late 1860's fashions, as most dresses of that era possess this feature.  The gown on the bottom is pleated all the way around, so it is more likely earlier.

2. Shaped skirt panels

On the dress on the top, it is easy to see that the front panel of the gown is shaped (looking at the seam down the front where the stripes go two different directions), and not a straight or "tube" skirt like the dress on the bottom.  This is harder to see on original gowns, fashion plates, and portraits, but easier to notice in original sewing patterns.  This kind of skirt is called a gored skirt, and usually has the regular amount of fullness in the back, but with a flatter shaped front panel.

3. On ball gowns--straight waists


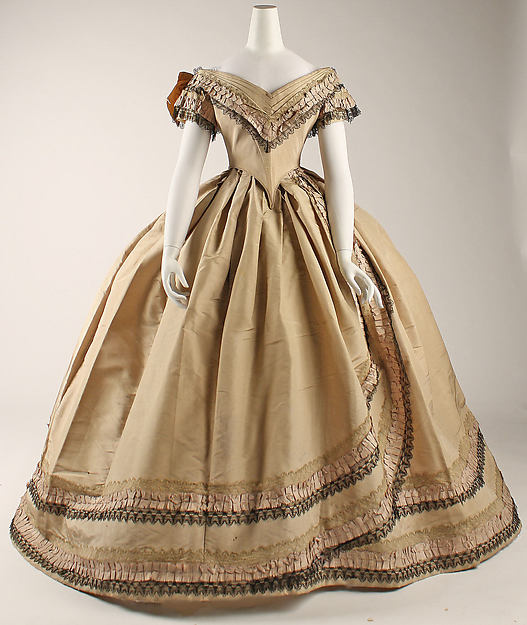
As you can see on the top, this ball gown from the Kent State museum, dated 1860-1869, features a waistline just like you would see on any old day dress or evening dress.  On the bottom, a gown from the Met Museum features a pointed waist.  The pointed waist is one of the hallmarks of the early 1860's ball fashions.  The straight waist for ball wear did not come into fashion until about 1864, and they did not gain in popularity until after the war.

4. Angular and/or unnatural placement of trim


The CDV on the top shows another trademark of the late 1860's, angular bodice trim and/or unnatural placement.  Box-like bodice trim became very popular in 1864, along with other geometrical placements of bodice trim.  This zig-zag is also interesting because it is placed in a random part of the bodice.  During the early 1860's, as I have seen, most bodice trim follows the natural lines of the body and of the bodice itself.  Therefore, a lot of trim along the bodice openings, the arms, and the darts (often continuing to the shoulders) is seen.  The CDV on the bottom shows a woman that has regulated her bodice trim to the line where her yoke begins, which is more indicative of the early 1860's.

5. Skirt Peplums/"Butt fluff"

I have no idea what to call these things, so I'll let the pictures speak for themselves.  These trends scream late 1860's and early 1870's, so it's very important to avoid them if you are making something to wear to early 1860's events.


Two examples of skirt "peplums", for lack of a better word.


And, two examples of "butt fluff".  This includes, but is not limited to, bows, additional fabric, trim, etc.


Thank you everyone for listening!  If you have any questions or additions, feel free to add them in the comments!