Showing posts with label Regency. Show all posts

Tuesday, August 12, 2014

The Louisville Jane Austen Festival

Hello everyone!  Long time, no talk!  In the weeks leading up to the Jane Austen Festival, I feverishly sewed quite a lot, and in the weeks after, I completely crashed from all of the stress.  Finally I'm getting on my feet again!  With all of the stress that Jane Fest brought, it was immensely fun and worth all of the work.

The weekend began with an early morning drive to Louisville in order to drop off two pairs of trousers and one waistcoat for my dear friend Julia at Bingley's Teas.  After that we wondered around for a bit and finally ended up at the home of our dear friends, Brian and Amy, who were hosting my dear Regency sister, Erica.  We sat around, sewed a bit, and ate pizza until we were ready to Twilight Shop.  I wasn't feeling well so I didn't think I wanted to dress out for the shopping... but about 1 hour until showtime I made the snap decision to dress out anyway!  Monsieur Stay-Lacer Brian aided in my dressing and we went and shopped until we dropped.

Mr. Cushing has many talents. Photo by Amy Liebert.

Saturday brought lots of fun!  We spent most of the day practicing our first-person impressions with Brian and Amy, which was quite fun.  I wore a new gown based off of this original from the Bath Fashion Museum:


I decided to shorten the waistband and make the skirt flat-fronted in order for it to be suited for a time closer to 1815 than 1820.


I accessorized with the bonnet I made in Lydia Fast's workshop, with added cherry blossoms.  Photo by Reva Shottenstein.

There was a light rain in the afternoon, so I covered my bonnet with my wool shawl, courtesy of Maggie :) Photo by Janet Abell

Mr. Loomis had a grand old time, getting to join the boys at the Hellfire Club (don't worry, we had our own inaugural meeting of the Sweet Angels Temperance Society) and serving Mr. Cushing as his second in the duel!  We finished the evening with a fun get-together at Brian and Amy's, watching Blackadder and playing Question and Answers.

For Sunday, I refashioned the first Regency gown I made.  I was just a novice seamstress when I had made that gown and it was no longer indicative of my skill as a seamstress.  I threw it into a corner of my closet and vowed never to wear it again.  


Not only was it an earlier style than the period I currently portray, but it also had some crazy horrible stitching, an accidentally unlined back, and overall clumsy construction.

In my scramble to get gowns ready for the festival, I saw this original on Pinterest, and I was absolutely taken.  I knew I needed to make it, and my old gown was the perfect canvas to start on.


I essentially tore the gown apart, recut the bodice, added piping to the skirt, changed the sleeves, and put it back together.  Then, in a moment of blind faith, I threw it into a dyepot and prayed!  And I LOVE IT!


Photo by Jessica Bagley.  The hat was purchased from Lydia Fast on Friday night, and worked perfectly with the gown!  Maggie, again, helped me out and made the ruff for me to wear.

All in all, we had the greatest time.  It's hard to express how dear this event is to my heart, and I can't wait for next year!

With love and care,
Mifs. M. Alexander

photo by Dale Matthews

photo by Janet Abell

Tuesday, April 29, 2014

Regency Clothing for Mr. Loomis

This past weekend Mr. Loomis and I were honored to go to an event at Historic Tunnel Mill, a lovely up-and-coming historic site just outside of Louisville, KY.  This was Mr. Loomis's first event in 1812 clothing, and he thoroughly enjoyed it.  In preparation I completed a few projects that were in my mind to make since Jane Austen Festival last July--clothes worthy of a Regency Dandy.

First was the shirt.  To be honest, I picked up and put down this project so many times that I forget how long it took me!  I had it on the roster since Fall of last year, and it's not even completed yet (it still needs a few reinforcements).  I used the Kannik's Korner pattern and a very light, delightful handkerchief linen.

A picture of the shirt in progress--I'm immensely pleased with the little chest ruffle.

Next on the list was fall-front breeches.  I used the Kannik's Korner trouser pattern modified into breeches--I think next I'll make him a pair with a shaped seat and a slightly tighter leg.

Sam helped cut them out before a night of English Country Dancing--very appropriate!

Before I put the fall buttons on, this was their state.  Fall fronts really aren't that difficult, it's just a matter of motivation!

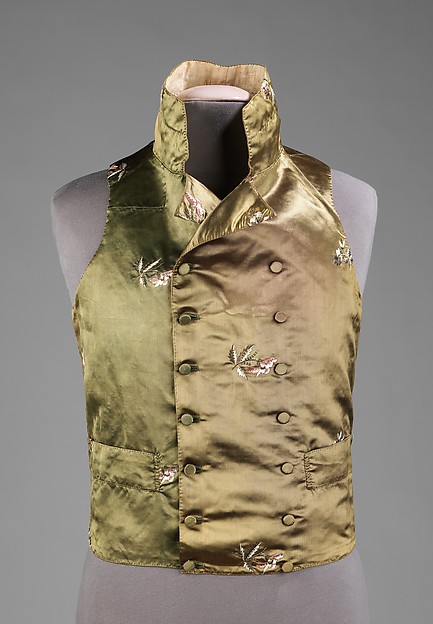
Next up was a double breasted waistcoat.  I made the mistake of only getting 1/2 yard of silk (and in a stripe!) so it was a headache to cut it out, but I did it without having to piece anything!  I had made a waistcoat before for my friend David, but it was single breasted and had no welt pockets--needless to say this one was an experience and a half.  I had to alter the pattern to account for the double-breast, had to attach twice the buttons and sew my very first welt pockets ever.  I'm pleased with how it turned out!

This is the waistcoat that served as the main piece of inspiration for Sam's waistcoat.

This is the fabric I had left after cutting the waistcoat out--I really pushed the limits on this one!

Preparing to padstitch (one of my favorite things!)

Padstitching...

My first completed welt pocket!  I sewed these very late at night--I was tempted to leave them off of this waistcoat but they really did improve the look.

Since I'm a procrastinator, I didn't get his wool tailcoat finished quite yet, but my dear friends Julie and Terry sold us one of Terry's old tailcoats, which fit Sam impeccably.  He wore a straw hat from Regency Revisited and brown-top boots from Fugawee (a little present for our one year anniversary coming up!)  Here is him all dressed out and looking sharp.

Doesn't he look handsome?

A view of the back


Showing off the waistcoat--we've decided to make the blue wool into a tailcoat that just barely buttons in the front so he can wear it open and show this lovely thing off!

It came down to the wire on a few of the projects but I'm so happy we got him out for his first 1812 event!  He's very excited and can't wait to go to another reenactment--and neither can I!

Friday, March 21, 2014

Historical Sew Fortnightly Challenge #5: Bodice

For a recent clothing presentation for my Jane Austen class, I completed a (hasty) reproduction of this gown from an 1812 Costume Parisien fashion plate:


The fabric is a lovely plaid that I got for dirt cheap ($1 a yard!) a while back.  I, of course, have a sizeable stash of white fabric, but since I was making this dress very quickly I didn't want to dip into my strategic muslin reserves.

I cut an 1860's bodice and sleeves out of the fabric before giving up on making it before Gettysburg.  And yes, after making the entire 1812 gown I still have enough for an 1860's sheer!

This was also the first gown that I draped on myself.  I'm decently satisfied with how it turned out.  I think I need to change the placement of the gathers if I make it again.

My first adventure in bodice draping!  I literally threw muslin on myself and fiddled with it until it looked ok.

I began on the gown on Friday evening after class, worked on it all weekend, through the next week (and midterms!) and finally finished it at 3 AM on Friday morning.  I think it turned out pretty well for a 1-week dress, although I am tempted to do a bit of alteration on the ruffle.  That's what happens when you decide to put one on at midnight the night before your presentation!

The day of the presentation I accessorized with my bonnet and a pair of vintage gloves.  Another warning against 3 AM ruffle sewing--look at the bottom of my gown.  See how it is bunched up?  Yeah.  I didn't notice that until looking at these pictures.  Le sigh.

All things considered, it was a fun experience.  Here are a few more pictures of me in the gown (my apologies for it being a bit wrinkled)


The Challenge: #5: Bodice
Fabric: A few yards of plaid 100% cotton lawn, lined in cotton muslin
Pattern: my own
Year: 1812
Notions: Three hooks, some cord for the ruffle, and polyester thread
How historically accurate is it?: All in all I'd say 60% since the bodice is flatlined, most interior seams are sewn by machine, and the specific plaid pattern is debatable.
First worn: For a presentation for my Jane Austen class
Total cost: Less than 10$!

Also, if you're interested, my friend Sabine at Kleiding um 1800 reproduced the same gown.  Go check it out!

Thursday, February 20, 2014

Historical Sew Fortnightly Challenge #4: Under it All

Sorry for the long hiatus!  The stress and craziness of school beginning got in the way of any exceptional projects, so I just didn't have any time to post.  However, I did get one small thing finished.  This petticoat is actually a remake of my previous bodiced petticoat--something that I made with no documentation and very poorly (feel free to smack my wrist!)  I decided to tear everything apart and make it up completely differently.  Here is my new Regency petticoat!


The Challenge: #4 Under it All
Fabric: Cotton muslin
Year: 1810-1820
Notions: Polyester Gutermann thread and two china buttons
How historically accurate is it?: I would say 80%.  The cut is period correct, but I sewed all of the long seams by machine.
Hours to complete: about 5
First worn: Just for pictures
Total cost: $0, since everything came from the stash!

Saturday, December 7, 2013

Historical Sew Fortnightly Challenge #24: Re-do

Hello everyone!  Finally, finally, finally I've made myself a new pair of Regency stays.  I don't know if y'all remember the last ones (monstrosities that completely squashed me and were made with incorrect methods and metal grommets...) but I ripped those apart and, though I re-sewed the gussets in, that's as far as I got.  I bought the pattern and supplies for these stays about a year ago, originally planning to make them for the Pittsburgh Jane Austen Festival, which I didn't end up going to, and then for the Louisville Jane Austen Festival, but they sat untouched as I had other projects to work on.  I finally started work on them in September and now they're finished!  Hopefully they'll last me for a long time, because I really did not enjoy working on them.  Right now they're wearable, however I will be adding an extra eyelet in the straps and possibly a small pad so that the "girls" don't shift during flight ;) This is my late entry for the 24th HSF challenge!


The Challenge: #24: Re-do
The Challenge(s) you are re-doing: 
#1: Bicentennial: These were made with the years 1810-1820 in mind, so they're good to go for 1813!
#2: UFO: While these weren't *started* earlier, they did sit around forever, and I did mean to make them for a long time!
#3: Under it all: The most necessary undergarment--stays!
#13: Lace and Lacing: One of my favorite parts of this garment was doing spiral lacing for the first time.  I love the look, however I've been spoiled by having cross-lacing 1860's stays!
#15: White: These stays are the classic Regency white.
#19: Wood, metal, bone: These use a wooden busk in the front and boning (although it is plastic!)
#23: Gratitude: I am so thankful to all of my friends for their help in making these (and also cheerleading when I needed it!)  Namely MaggieSabine, and Betsy.
Fabric: Handkerchief linen and linen canvas from fabrics-store.com.  I highly recommend both of these fabrics (especially the handkerchief linen, I'm addicted to it!) because they are very high-quality and wonderful to work with.
Pattern: The Mantua Maker Regency stays pattern (which you can find here!)
Year: 1810-1820
Notions: Plastic zip ties for boning, wooden busk, machine sewing thread, hand sewing thread, and buttonhole twist, some thin poly ribbon for a front drawstring, some thicker poly ribbon for the lacing and the strap ties, and one china button.
How historically accurate is it? The fabrics and the pattern are correct, as is the wooden busk.  I did use plastic bones and polyester ribbon and thread.  I would say these are 85% correct.
Hours to complete: I lost count a long time ago, as I worked on them on and off.  If I had to guess I'd say 25 hours.
First worn: I haven't worn them yet, but the first event I do wear them to will likely be the Locust Grove Ball.
Total cost: About $60, all things considered.


Sunday, November 24, 2013

The Ubiquitous Blue Coat of the Regency Era

Hello everyone!  In preparation for making the beau's regency items, I've done a lot of research regarding men's Regency fashions (with a lot of help from my friends BrianMaggie, and many others).  In case you couldn't tell from the blue cravat and blue vest I made Sam for the 1860's, Sam barely wears anything but blue.  I had originally planned on making him a black tailcoat from some suiting-weight wool that I had in the stash, but through researching I found out that isn't quite the weight we're going for in the Regency.  I kept finding more and more blue tailcoats in the era, and I came to the conclusion that 1. hopefully this tailcoat would last a very long time and I wouldn't have to make a new one for a while and 2. if they had blue tailcoats, then why the hell not?  I searched and searched for the correct weight of blue wool, but to no avail.  I came pretty close on some of the places I looked at, but either they didn't have the right weight of fabric or they didn't have the right color.  I even went to Joann's, of all places, but that fabric struck out on both accounts.  The night before the Market Fair at Locust Grove, I was talking to Maggie and mentioned my search, and she ended up having the perfect wool for me!  I can't thank her enough, especially because there will be enough left to make a pretty little something for me!  Anyway, enough talk, here are some of the many fashion plates and extant images that show this classic look.

c. 1817

Thomas Cooke, English actor (1786-1864) by James Warren Childe (1780-1802)

Incroyable et Merveilleuse

Costume Parisien 1804

Costume Parisien 1814

Le Beau Monde, 1807

Costume Parisien, 1804

And finally, the tailcoat and waistcoat fabrics I'll be using to achieve this look.  Wish me luck!

Edited to add: thanks to Betsy Bashore for helping me out on terminology.  Anywhere that I referred to a "tailcoat" with the words "frock coat" has been fixed!

Monday, November 11, 2013

The Lydia Fast Bonnet Workshop

Whew!  What a whirlwind!  I had such a great time at the workshop and learned more than I could have expected to learn about millinery.  It's not so scary now!  I'm very pleased with how my bonnet turned out and surprised that I finished it this quickly.  Here's how it all went down...

First, I drove three hours to Ft. Meigs, where the workshop is held each year.  I had a bit of time to kill so I hung around the historical district.  Then we set up and went to dinner and to pick up some supplies, back to the classroom just in time to start work.  I chose to do the Pip, a style with a short crown and a curled brim.


This was one of the more difficult options, but I decided that I'd get my money's worth and do it anyway.  I chose a very pretty pink silk for the brim lining and a yellow for the crown.  This was my inspiration piece:

Ackermann's Repository 1814

Anyway, we received pre-cut pieces of buckram and mulling and a few other supplies.  We started by assembling the crown of our bonnets.


I half-attached my brim before we decided that it was time to turn it in for the night.  My friend Julie graciously let me stay at her house, so we went back there and stayed up a bit longer talking :)

Once we got back to the classroom the next morning, we started back to work.  I finished attaching my brim.  Since I chose the Pip, I had to steam-form my brim in order to give it that cute curled look. 

Here it is before steaming...

And after!

Once I finished this, it was time to take a little break and head to a great store called the Ribbonry in Perrysburg, Ohio.  It was intense!  Some of the ribbons were more per yard than a lot of my dress lengths of fabric!


As soon as we walked in I found the perfect plaid ribbon for Julie and helped my new friend Alyssa find a ribbon for her poke.  I promised myself I wouldn't buy anything but I laid eyes on the most perfect ribbon for my bonnet, and knew I had to get it.  Alyssa was so thankful for my help in picking her ribbon that she bought the ribbon for me!  It was incredibly generous of her and I am still floored.  So, you all should go to her website and buy her books, as she is a Regency author!


It looked perfect with my colors!

Once we were finished with the Ribbonry, we returned to the classroom and put our noses back to the grindstone.  Finally it was time to touch fashion fabric!  I first attached the crown tip, followed shortly by the brim fabric.


I then attached the brim lining--in my pretty pink silk!


I only got halfway through attaching the lining before my back started hurting and we decided to call it a night.  We went back to the house and had some laughs, and I slept like a rock that night.

Bright and early Sunday morning, we started again.  I finished attaching one edge of the brim lining and then attached the inside edge.


Next up was covering the crown.  I could taste the finish line! Thankfully, I was able to attach the crown before the end of the workshop.  Yay!


After I finished attaching the crown piece, I packed up and headed for home.  Today, I was able to put in the lining and attach the ribbon, and I'm very happy with how it turned out!  I might add a feather or some flowers, but here it is in its present state.


I struggled with the bow, but I really like how it turned out.  I'm planning on wearing this to the Jane Austen Festival next year, but hopefully some event will arise that I can wear it to, as well!  The workshop, all in all, was very fun and informative, and I will definitely be going again.  And now I can honestly say that millinery doesn't scare me anymore!